Saturday, September 22, 2012

Hanging Shelves EASILY!


Having recently redone our kitchen (and repainting our family room), we are now in the process of hanging things back up. I absolutely HATE hanging shelves (and pictures with two hooks). I always measure, use my level to draw a line on the wall, but somehow it seems my measurement is always off slighting and it's a pain!


I saw this idea on Pinterest and it was the perfect time to try it out.  All you need is your shelves, a level, nails/screws and some tape. That's right... NO PENCIL OR RULER!

Rip off enough tape to reach from one hole to the other. You will need to make sure that your tape is the same level.  For example, I used the top of the screw to be the top of where I put my tape.  Stick your nail/ screw through the tape where the nail will be.  


Then all you have to do is remove the tape and put it on your wall.  This is where the level comes in.  Make sure the tape is level.
:-)
Then, just put your nails/screws through the holes you marked and hang your shelves.
It's THAT easy!

Classroom Management Ideas


The hardest part about teaching is never the curriculum... it's classroom management.  
When I taught third grade, I used "Doran Dollars"~ an economy system where students were 'paid' for jobs they did (after applying and interviewing for 'said' job) with money that they designed (they voted in their favorite design).  Just like they were paid for their jobs (and could earn bonuses), they also had to pay for things and did have 'fines' if they did not get something turned in on time, or broke a rule.  Every so often I would have auctions where students could bid on dollar store toys, candy, lunch with me... etc.  I absolutely loved it, and so did the kids! It was something I stole from my awesome coworker (Sheryl), who is wonderful.

When I went back to first grade, there was no way that I could manage the economy system (or maybe it was just because it scared me to try).  Either way, I asked around and got some other management ideas.  The teacher's class I took over (Kelly) and my kids kindergarten teacher (Caron) had a card system and seemed to really like it.

The way it works is every child has a number (alphabetical order).  I have a pocket chart with each student's number and inside their pocket are four cards~ a green, yellow, red and red X.  Obviously this is first graders so they get more reminders than my third graders ever did, but after two reminders or so I have them "pull a card".  I don't contact home unless they pull the "Red X".  Each day they start out fresh again with a green card.

I got to thinking that this was working well but I needed to keep track (record) how they were doing each day and I wanted to reward all of my students for doing well.  I decided that every time my students have 5 green cards (they don't have to be in a row) they can visit my "Prize Bucket" (candy and dollar store treats).  So I found some calendars in an old book I had and made some copies.  At the beginning of each month, the students color their own calendars (you can't see on the picture below, but there is a picture on the other side). I keep all of their calendars and each morning, I mark what color card they had with a letter.  I usually go through and mark the non-greens (since usually there aren't too many) first and then I go through and let the class know how many more 'greens' they need to go to the prize bucket.  When they go to the prize bucket, I mark that by putting stickers over the five greens. This only takes minutes and is a great way to start the day.

At the end of the month, I record my entire class's behavior by marking in my book how many yellows, reds and Xs they had. I reference this during report card time.  I have found this really informative because there are students that  need reminders, but don't necessarily need calls home all the time.  By sending these calendars home each month (and encouraging parents to ask their children what 'color' they were each day), I have found that there aren't any surprises at report card time.

No surprised makes happy parents.
And happy parents= a happy teacher.


Wednesday, September 19, 2012

3,2,1 CAKE!


 This summer my mom made the kids a "Magic Mary" cake.  Her friend Mary told her about it and it was perfect because it is lower cal (my mom has lost a ton of weight through WW).  The cake is really called "3,2,1 Cake" though "Magic" would be an appropriate name!
3,2,1 Cakes are perfect for someone who wants a little cake in a minute (literally).
All you really need to buy are two things:
1 box cake (of your choosing) and 1 box of Angel Food cake.
Take the mixes and then mix them together in a bowl.
Now for the magic...
In a mug add
3 T of mix
2 T of water (stir well with fork)
and 1 minute in the microwave and
VOILA!  CAKE!!
 You can add whatever you'd like for a topping.  I prefer frozen Cool Whip because it's yummy (and the "Lite" variety isn't too bad for you).  My kids love the chocolate variety but I prefer carrot cake so we have both mixes stashed in the pantry.  My kids like their cake on a plate but I eat mine right out of the mug!
If you'd like, you can add raisins or candy or other things to "spice" up your cake.  This is definitely something you're going to want to steal and try! I sure am glad I did!

Tuesday, September 18, 2012

Keeping My Mornings Sane!


I am NOT a morning person!  My husband is, but he is long gone (to work) before the four kids and I wake from our slumber.  He and I have a good thing going.  He does lunches and I do clothes.  Still I felt like I was always scrambling in the mornings... matching socks... steaming out wrinkles... praying my Bigs (who chose their own outfits) were matching! Getting them dressed, teeth brushed, fed, shoes on (you get the idea), left most of my mornings feeling frantic and rushed.

I was shopping in Ikea a few weeks ago and found these canvas-type shelves that hang from closets.  They had five shelves, perfect for Monday through Friday!  My kids don't have traditional rods in their closets, so I had to hang them using hangers.  I made little signs with the days of the week and we lay out all their clothes on Sunday night.

This has made my mornings HEAVENLY!  I know in the mornings that the kids will have wrinkle free clothes (because I take care of that on Sunday) and clean underwear.  I check the weather and let the Bigs pick out their own clothes.  Zach (my five year old) has even begun doing his own clothes (he had been just doing underwear and socks). I do the two year old's clothes (obviously) and put a diaper for each day too (one stop and I'm DONE).

My Big kids have deodorant now and they put it on to the new shelf each day after putting it on (which also makes me feel good knowing that they will smell fresh and lovely). I think this is a wonderful thing for people (like me) who hate mornings (and have a lot of little people to get out the door every morning).

What I really need now is to get this organized for myself...


Mr. Potato Head Party


 I stole this idea from my friend Lisa H. at work!  She is on Pinterest (I need to start following her) and always finds these great ideas.  Right now at our Costco, they have these giant Mr. Potato Heads for $20! Inside are two spuds and lots of fun accessories.  Though these guys would be fun for an indoor recess, that's not what we're using them for!
I got one spud all dressed up and showed her to my class.  Then I took all her parts off (one by one) and put them back into the giant Mr. Potato head.
 Each time my class works as a team and has a great day at one of their FAPES (fine arts~ music, art, PE, media center... etc), I add a part onto our spud.  When she is fully dressed they are going to get 15 minutes to do whatever they want (if it's a nice day we'll go outside). The kids were so excited!  They had a great day in PE (and earned some legs) and media center (eyes).  They are already asking if the next spud can be a boy (of course)!
 I like keeping all the needed parts in the big Potato Head so they can see how many pieces they still need.  I took the other 'extras' and put them somewhere else so it would be really obvious to the students how many more items were left.

Orphan Crayons Find a Home


As a teacher, I am always finding orphan crayons. I found that most of my students didn't like coloring with broken crayons (or even well-worn long crayons) so were throwing them out.  Instead of throwing them out, I had them put them in an old tub.  You can see that the orphan crayons got kind of out of control.  I thought I should melt them down and make new crayons but then I thought of some other kids that I didn't think would mind the orphans.
 My kids (and especially my oldest son) LOVE to color and draw.  My Joe has colored pictures with crayons that really SHOULD be thrown out (less than an inch long).
I have mentioned before that my kids are the messiest in the world so often they lost their crayons.  There may be some in Joe's room, a few in the car, some in an old backpack... (you get the idea). And so I got an idea.  Time to organize the old crayons and give my kids an OBVIOUS place where the crayons should go.  So I bought these cute little drawers at Bed, Bath and Beyond and put my kids to work.
 I had them sort the colors (which was also a fun activity for my little kids~ age 5 and almost 3). They did a great job and sorting them took no time at all.  Soon they were working on projects with the 'new' crayons and they loved that they had all the colors that they need right at their fingertips (and no fighting over colors because there are so many).
I was going to make some cute labels for the drawers (because that's just how I do things), but they didn't need them.  You can see the colors right through the drawers.  I thought this was a great idea and plan to pick up more drawers for the future orphans that will no doubt again grace my classroom this year.

Thursday, September 6, 2012

Brilliant Birthday Bag


 Because we have many students in our building with severe food allergies, my school went to "non-edible" birthday treats this year.  Secretly I LOVE the idea! I was never a fan of the mess cupcakes made in my room or loading up my students in all that sugar (and then trying to teach).
I have given the parents different ideas to celebrate, which I think are way better than the cupcakes ever were... They can send in a wrapped book for their child to unwrap and I will read it to the class.  That book can then be donated to the classroom library or sent home with the birthday child. They could also send in a fun game for indoor recess and of course send in non-edible treats for students (pencils, stickers and other dollar store finds...). What I am most excited about though is the Birthday Bag.  As I mentioned in my "Terrific Tooth Tote" post, I got three bags for $9 at JoAnn's. Last night I got my puffy paints out yet again and made a Happy Birthday Bag.
The birthday bag will go home with the birthday child.  I have put different "birthday" books in the bag for children to read with their families and (my favorite), "Ollie the Owl."  Ollie (as I named him) was a gift from my friend Jessica who noticed my Owl decorations in my classroom and gave it to me after a blog workshop I did (thanks again, Jessica!). My students get to keep Ollie with them all day and then take Ollie home with them overnight to help them celebrate.
This is a picture of the outside of the binder.
I then made a binder (very similar to the Terrific Tooth Tote), where children can write about how Ollie spent their birthday with them. It was very easy to make.  I just searched google for an image of an owl.  You could do this for any little stuffed animal you had. I used a binder with a plastic covering which made it easy to design a cover and slide it in.
 The first page of the book includes instructions to the families on what they do with the binder.  I did put a note on the bottom of the page that says that this is an "optional" activity and not something that has to be done. This note is in a plastic sleeve and I put more plastic sleeves behind the first page for students to add the page they made.  My hope is that students will take a moment to read their friends' pages.  I will also read the page the next day in class so that everyone can hear about Ollie's adventures.  At the end of the year, I will take out their birthday page and add it to their portfolio and send it home as a fun keepsake of first grade..
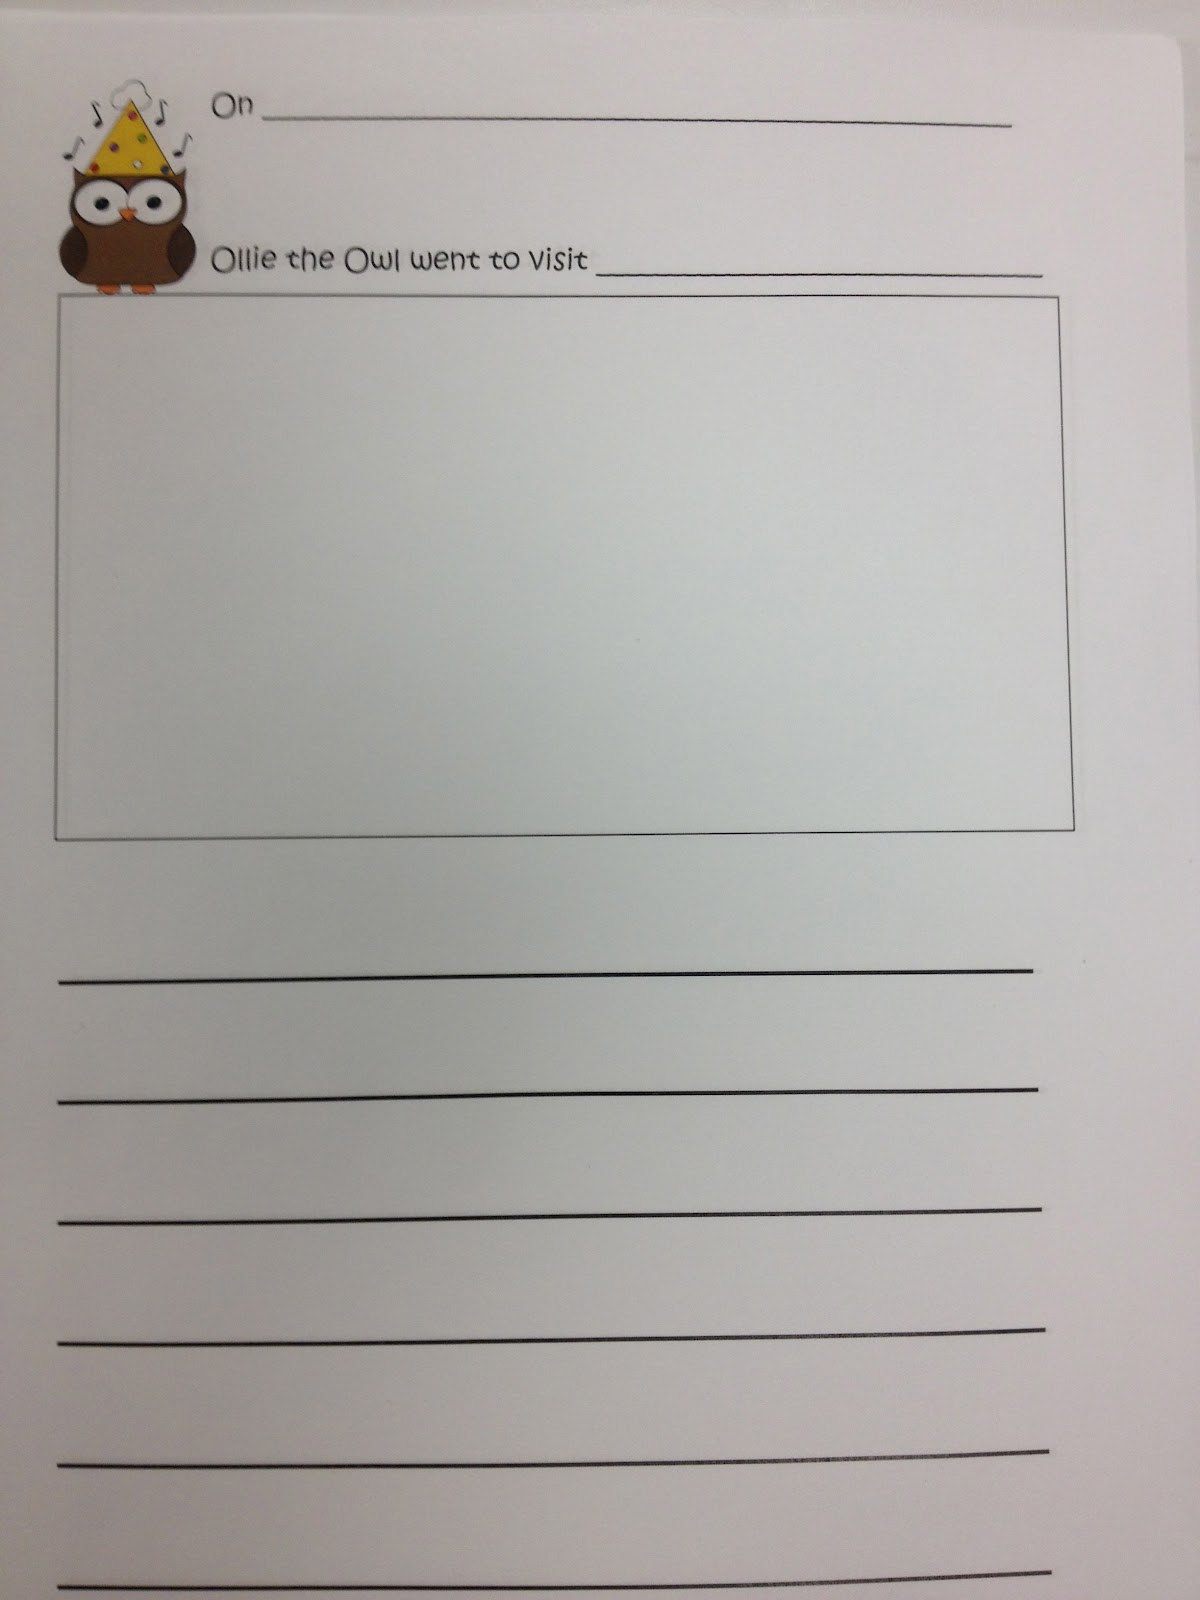
In the first pocket, I have an easy template for the students to record what they did with Ollie.  I created a simple box at the top for an illustration and lines at the bottom for writing.  I created this page in Publisher.  Again, I used the same image I found on google. I am really excited about this and so were my students.  Ollie is having his first sleepover tonight!  If you like this idea too, steal, tweak and make away! If you click on the pictures you should be able to enlarge them.